| • | Selecting a Gauge |
To modify a Gauge, first select it with the mouse. Simply left click anywhere within the outline of the Gauge. FS Panel Studio will highlight it in yellow. Some operations, such as resizing or moving, can be performed on multiple Gauges at one time. To select multiple Gauges, simply hold down the <cntrl> key while selecting additional Gauges.
You can also draw a box around multiple Gauges to select them. Start with no Gauges selected. Hold down the left mouse button and drag it over the screen. A box will be drawn -- drag it over and totally include the Gauges you want to select.
Once a Gauge is selected, its name will be shown in the status bar on the bottom of the Main Window, along with its Index number in the panel.cfg file. To step through all the Gauges in your panel, select one, then press the TAB key. The Gauges will be highlighted, in turn, with each TAB.
The Edit:Select All menu pick will select all Gauges on a Panel.
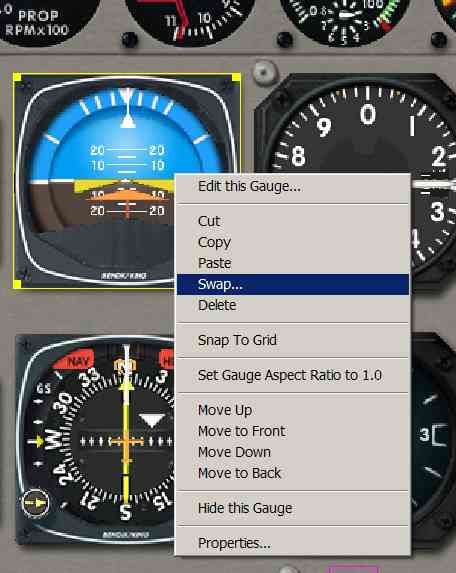
Right Clicking on a selected Gauge will bring up a context sensitive menu, showing additional editing options (explained below)
Double clicking on a Gauge, or right clicking on it and selecting the Properties menu pick, will bring up the Gauge Properties Window, as shown below:
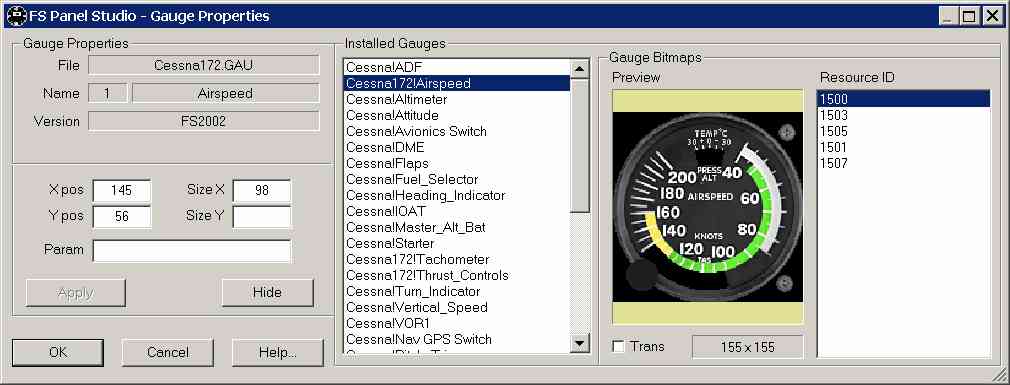
The Installed Gauges pane lists all Gauges installed on this Panel, with a Preview of the Gauge Bitmaps shown to its right. The far right pane shows either the Resource ID of the previewed bitmap, or the filename of the BMP file in the case of XML Gauges.
On the left are Gauge Properties, name, position, size, and details of the bitmap. Also shown is whether the Gauge was built for FS98, CFS, FS2000 or FS2002/4. Flight Simulator is backwards compatible, for example FS2002 can use all Gauge types, while FS98 can only display gauges built for FS98.
The X pos, Y pos and Size X and Size Y values may be changed by simply typing in new values in the appropriate spaces. X and Y pos determine where (in MM) the gauge's top left corner is drawn on the Window. The Size X value is the width (in MM) of the Gauge. FS2000 introduced a Size Y value. If not entered, the gauge will be drawn with an aspect ration of 1.0. If set, the Gauge will be drawn with a height of "Size Y" MM, with the bitmap stretched to fit.
The Param field was also introduced in FS2000, and a good example of its use can be found in the Concorde Aircraft. It's a value which is passed to the Gauge by Flight Simulator at run time. In the case of the Concorde, the Param is used with some of the Engine Gauges, to identify the particular engine to which the Gauge will associate. Thus there is no need for four separate Gauges for four engines, only one Gauge with its engine parameter.
When you make changes to the Position, Size or Param of the Gauge, the Apply button will become enabled. Press Apply to immediately see your changes on the Window in FS Panel Studio.
The Hide/UnHide button will hide a selected Gauge from view, or un-hide a selected Gauge that is hidden. This has no effect in Flight Simulator itself, this is only a convenience function within FS Panel Studio. Use it with Gauges which are slow to draw and interfere with editing, or to more clearly overlay Gauges.
If you decide not to keep changes you've made, the Cancel button will exit and return the Gauges to their original properties.
| • | Moving a Gauge |
As the mouse moves over a selected Gauge, the cursor will change to indicate that FS Panel Studio can move it. Press the left mouse button and hold it down, then drag the Gauge to its new position. The top left corner of the Gauge outline will change to a magenta color, and the coordinates of the top left corner of the Gauge will be shown dynamically in the bottom status bar.
If more than one Gauge is selected all will be moved at the same time.
For ultimate accuracy, you can use the <Up>, <Down>, <Left> and <Right> arrow keyboard keys to move a selected Gauge(s) in 1 MM increments.
The Gauge can also be moved by typing new values into the X pos and Y pos fields in the Gauge Properties window.
| • | Resizing a Gauge |
As the mouse moves over the edges of a selected Gauge, the cursor will change to indicate the it can resize the Gauge. In FS98, you can not change the width independently of the height of a Gauge, it will always maintain its aspect ratio. In CFS/2, FS2000 and FS2002/4, however, you may vary the two dimensions independently. Dragging the corners of the Gauge will change the overall size of the Gauge, dragging the sides or top will alter the corresponding width or height.
There is no support in any version of MS Flight Simulator for rotated or non rectangular Gauges.
If you wish to maintain the aspect ratio at 1.0 (to keep round gauges round, for example) hold down the <SHIFT> key while resizing.
If the current FS Panel Studio mode is set to FS98, you will not be allowed to alter the height or width independently, as this is not allowed in FS98.
For more accuracy, the <+> and <-> keyboard keys will increase and decrease the size of the Gauge in 1 MM increments. Using keyboard keys, you can resize multiple Gauges at the same time (as long as more than one gauge is selected, of course).
The Gauge size can also be modified by entering new values in the Size X (and Size Y for FS2000/2 Gauges) fields in the Gauge Properties window. Bring this window up by double clicking on a gauge or right clicking on a selected gauge and choosing the Properties... menu item.
| • | Cut/Copy/Paste |
You can use the Cut and Paste functions in FS Panel Studio just as you would in a Word Processor. Select one or more Gauges you'd like to copy or cut, and press the Copy toolbar button (or use the Edit:Copy or Edit:Cut menu picks; or right click on the gauge and highlight the Copy or Cut command). When you then press the Paste button, copies of the selected Gauges are added to your panel.
NOTE: If you are in FS98 mode, you will need to rename these new gauges, and FS Panel Studio will prompt you for this. This is because FS98 requires each Gauge included in a panel to be unique. For example, in a two engine aircraft, you cannot have two RPM.gau files loaded. You can copy and rename the files, however, and have an RPM1.gau and RPM2.gau.
NOTE: The Copy/Paste function is implemented internally in FS Panel Studio and does not use the Windows Clipboard.
| • | Swap |
The Swap function allows you to replace the currently selected Gauge with a new one of your choice. The dimensions and placement of the original Gauge are retained. This is a quick way to edit an existing panel.
| • | Set Gauge Aspect Ratio to 1.0 |
This function will return the currently selected Gauge's width to be proportional to it's height. For example, if the Gauge size internally is 100x150, the width and height will have a ration of 1.5 after running this tool.
Popup and Menu Functions
| • | Edit this Gauge |
FS Panel Studio allows you to easily edit the bitmaps found in Gauges. When selected, it will open the Gauge Editor.
| • | Snap To Grid |
This will force the origin (top left corner) of selected Gauges to be moved to multiples of the current Grid setting. For example, if your Grid is set to 10, and you select a Gauge whose origin is (9,9) and Snap it, FS Panel Studio will move it to (10,10). It will select the closest grid point. Grid size can be set using the Options:Grid Size... menu pick.
| • | Move Up/Down/To Front/To Back |
This menu item will move the currently selected Gauge in the drawing order. For example, to make sure a Gauge is drawn last, and thus on top of any overlapping Gauges, select it, right click and pick the Move To Front menu item.
Note that in FS2002 and FS2004, all non XML Gauges will be drawn before XML Gauges drawing begins. A non XML Gauge will never be drawn over an XML Gauge. FS Panel Studio faithfully follows this convention to allow you to preview Windows as they would be drawn in FS2002/4.
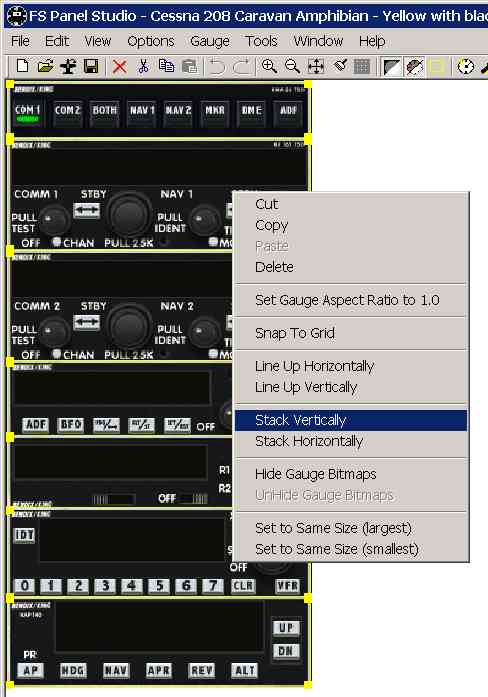
When multiple Gauges are selected, the menu changes...
| • | Line Up Horizontally/Vertically |
This will not display unless multiple Gauges are selected. It allows you to exactly line Gauge's left edges or tops. Select the Gauges you'd like to line up, then right click and select the Line Up .. menu item.
| • | Stack Horizontally/Vertically |
This will not display unless multiple Gauges are selected. It allows you to exactly line Gauges up vertically or horizontally with no space between Gauges, as in a Radio Stack. Select the Gauges you'd like to line up, then right click and select the Stack .. menu item.
| • | Set Same Size (Largest)/(Smallest) |
This will not display unless multiple Gauges are selected. Use it to set all the selected Gauges to the same size. For example, if you have multiple identical engine Gauges, eg four RPM gauges in a row, they can be set to the same size. The size of the largest or smallest selected Gauge is used as the new size.
Additional Functions
| • | Hide/UnHide Gauge |
Its occasionally useful to hide a Gauge, either when it's very large and slow to redraw or if it overlays other Gauges. This option temporarily hides the Gauge and draws a grey box around the Gauge position to remind you it's still there. To unhide the Gauge, reload the Window or scroll to the Gauge in the Gauge Properties dialog, then click the UnHide button. This has no effect on how Gauges are displayed in Flight Simulator.
| • | Copy Gauge Bitmap to Clipboard |
The Gauge's primary bitmap is copied to the Windows Clipboard. This is useful for exporting a Gauge bitmap to a Paint type program outside of FS Panel Studio. Note that only the first or primary bitmap of the Gauge is copied.