Warning: Gauge editing require a knowledge of both how Flight Simulator works, and also how Gauges are built. You can easily render a Gauge inoperative by incorrectly modifying its values. Minimal syntax checking is performed in XML files, as there currently is almost no published Gauge XML documentation from Microsoft.
FS Panel Studio will create backups of your files whenever possible to save you embarrassment, but its still recommended you take the time to read the Microsoft SDK documentation on Panel Design before you begin!
Starting the Gauge Editor
When a Gauge is selected in FS Panel Studio's main window, a right click of the mouse will bring up the menu with an Edit this Gauge option. This is described in more detail in the Working with Gauges section. Or you can also use the Gauge:Gauge Editor... menu pick, or the Gauge Editor toolbar button to start the Gauge Editor.
If you start the Gauge Editor directly, it will first display the following dialog to select a Gauge.
NOTE: All Gauges in the common Gauges folder will be displayed. Starting with FS2004, Gauges can now be located in the Aircraft's Panel folder. If you wish to use these in other aircraft you must first copy the Gauges to the common Flight Simulator Gauges folder.
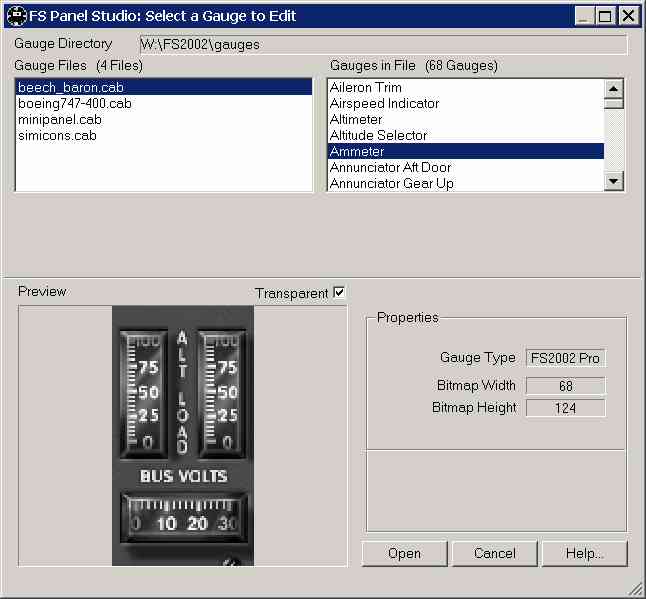
The left hand Gauge Files pane shows a list of Gauges found in your Gauges Directory. This is relative to the install path for FS2002, which is set in the Mode dialog.
When you select a Gauge File which internally contains multiple Gauges, you'll see a list of Gauges contained within the file in the right hand Gauges in File pane.
Selecting a Gauge will display a preview of the Gauge's appearance in the Preview area on the lower left (FS Panel Studio will attempt to load what it determines is the main background bitmap). Properties of the selected bitmap file are shown in the Properties area.
When you have highlighted the Gauge you wish to edit, select the Open button to start the Gauge Editor:
Depending on whether you have selected an XML Gauge or an "old" style .gau Gauge, you will see a different dialog, with different capabilities. FS Panel Studio allows you to edit all aspects of FS2002/4 XML Gauges, including their appearance and behaviour (you do need to understand how both Gauges and XMl works!). If you select an older Gauge format, you can edit the bitmaps of the Gauges.
XML Gauges
Selecting an XML format Gauge will display the following dialog:
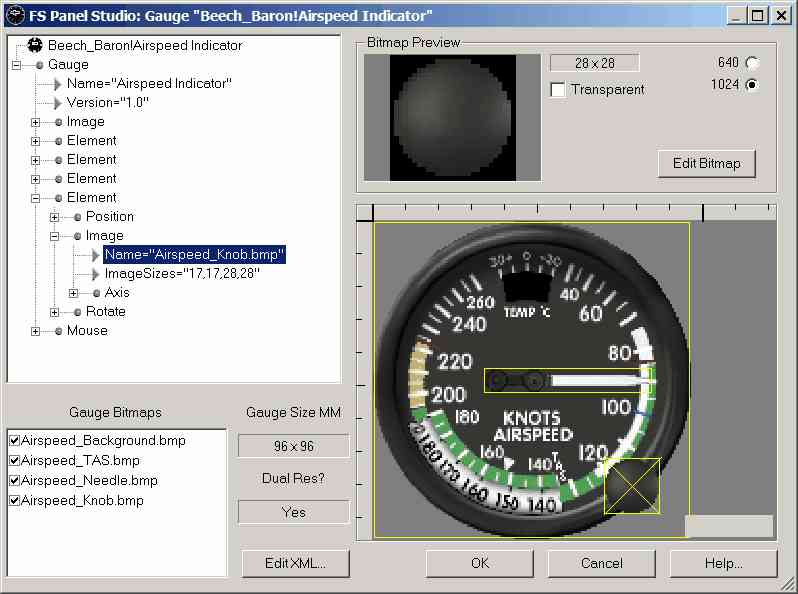
XML Gauges consist of Elements and Attributes. For example, in the figure above we see selected one of the Image element of the Beech_Baron!Airspeed Indicator Gauge, which has as its attribute, Name="Airspeed_Knob.bmp". For details on the inner workings of XML Gauges, consult the Microsoft FS2002 SDK.
The Gauge Editor displays a tree in the left hand pane showing all of the elements that constitute the Gauge. If FS Panel Studio determines that the attribute is a viewable bitmap (as in the example), it displays it in the Bitmap Preview window at top. Also shown is the size of the bitmap in pixels. The 640 and 1024 radio buttons determine whether FS Panel Studio displays the high resolution or low resolution version of the bitmap (see 640 - 1024 below).
The Gauge itself is drawn in the large preview window. All elements which the Editor can display are shown, outlined in yellow. If you left click on one of the elements, it will be highlighted with an X, and the corresponding Image Element will be highlighted in the tree view. In our example above, the Airspeed Knob is highlighted in both the Preview and the Tree views.
To the left of the preview is a list of the displayable bitmaps of the Gauge. Clicking in the box associated with a bitmap will toggle the display of the bitmap. This allows you see the effect of each bitmap, and allows you to see bitmaps which may be obscured under others. The Gauge Size in MM is also shown, for reference. This is the default size of the Gauge when installed on a Panel. The Dual Res box tells you whether the Gauge has separate bitmaps for both low res and high res. In FS2002/4, the low res bitmaps will be used if the graphics display is set to a resolution below 1024x768.
Double clicking on an entry in the tree with the mouse will bring up an appropriate editor for the selected Element or Attribute, or you can use the following buttons:
| • | Edit... |
The Edit button will be enabled if you select an editable Attribute in the tree view. Selecting Edit will bring up a small editing window:
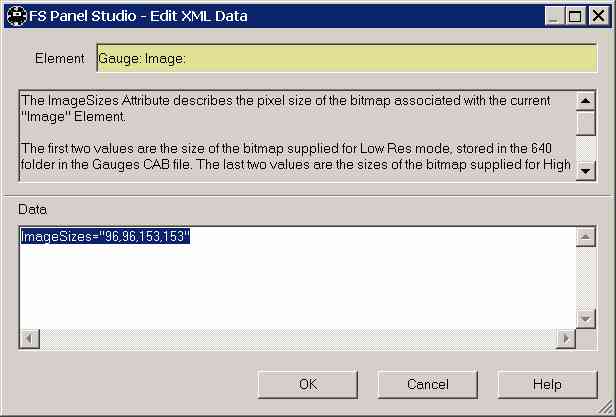
In this example we've selected the ImageSizes attribute in the tree view. The Element name will be displayed in the topmost Element box. In the middle box, FS Panel Studio will offer some help on the attribute, and what values are valid. Finally, the Data box will allow you to edit the data directly. Simply type in your changes an click on OK to save.
| • | Edit XML... |
You can edit the entire XML file by clicking on this button. The file will be opened in Notepad and can be edited directly. If modified it will be re-read into FS Panel Studio, and the tree view rebuilt.
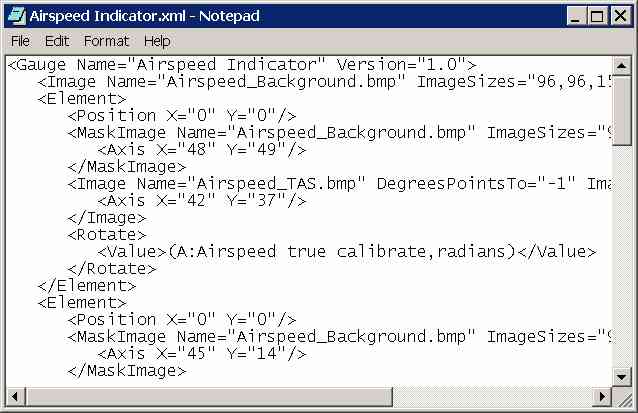
NOTE: You need to understand XML to use this function! FS Panel Studio performs minimal error checking on the entered XML.
| • | Edit Bitmap |
When a bitmap has been selected in the tree, a Bitmap Preview will be displayed and the Edit Bitmap button will become active. When this button is pressed, the bitmap editor specified in the Preferences dialog will be started with the selected bitmap as its file to open. When you have finished editing, FS Panel Studio will check to see if the file has been modified, and if so will insert the modified bitmap back into the Gauge. Note that if you change the size of the bitmap while editing, you must change the associated ImageSizes Attribute, and it may not display correctly in the simulator.
| • | 640 - 1024 |
These buttons control which version of bitmap is displayed and edited. XML gauges may contain two versions of each bitmap. The 1024 bitmap is displayed when the simulator is run at a resolution of 1024x768 or higher, the 640 bitmap is used at lower resolutions. These buttons allow you to select which image FS Panel Studio displays and extracts for editing. This is also related to the FS Panel Studio Load High Res Bitmaps and Gauges mode.
| • | Transparent |
This checkbox, when selected, will display bitmaps transparently in the Preview. This is a convenience function to help you better visualize the final Gauge. It has no effect on the Gauge in Flight Simulator.
Right clicking with the mouse while in the tree view will also bring up a menu with options relevant to the currently selected object. You can use this feature to add and delete Elements, for example. This is for advanced users only!
.gau format Gauges
Selecting anything other than an XML format Gauge will display the following Gauge Editor dialog:
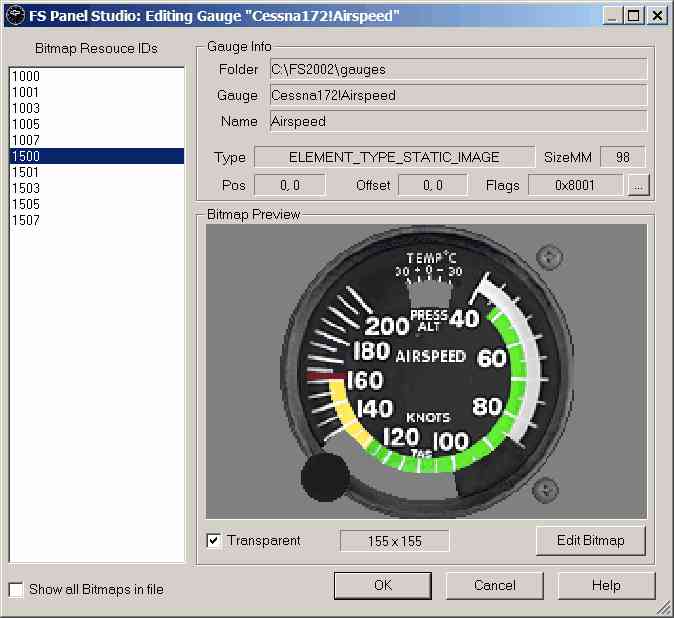
FS Panel Studio allows you to edit the bitmaps of .gau files. They are stored internally in Gauges files as Windows Resources. The Bitmap Resource IDs of the selected Gauge are shown in the left hand pane, and selecting one with the mouse will show a Preview of it. Information also displayed includes: the Type of element, for example Static Bitmap or Needle; the default Size of the Gauge in MM (this is used in Flight Simulator if the panel.cfg does not include a size entry; The Position of the bitmap relative to the Gauge position on the panel; the offset around which it rotates or moves; and the Flags associated with the bitmap. Clicking on the Flags "..." button displays the flag information in a more readable format.
| • | Edit Bitmap |
When this button is pressed, FS Panel Studio will create a bitmap from the selected Bitmap Resource ID, and the bitmap editor specified in the Preferences dialog will be started with this bitmap as its file to open. When you have finished editing, FS Panel Studio will check to see if the file has been modified. If so, it will be inserted into the Gauge. Note that if you change the size of the bitmap while editing, it may not display correctly.
Note that there are normally two version of each bitmap in the Gauge file, a low resolution and high resolution version. They differ by 500 in Resource IDs. In the example above, we're displaying the high res version of the Resource (ID 1500). There is a corresponding low res version at ID 1000. If you want your Gauge to have a consistent appearance regardless of what resolution Flight Simulator is running in, you will need to edit both IDs.
| • | Show all Bitmaps in file |
FS Panel Studio will display only the Resource ID belonging to the currently selected Gauge in the Bitmap Resource ID pane. However, the Gauge file itself may be a "Cluster Gauge", and contain multiple Gauges. Selecting this option will display all resource in the file, not just those associated with the currently selected Gauge.
| • | Transparent |
This checkbox, when checked, will display the selected bitmap transparently in the Preview. This is a convenience function to help you better visualize the final Gauge. It has no effect on the Gauge in Flight Simulator.
Misc Notes
Windows 2000 or XP are recommended if you are editing bitmaps in older .gau format Gauges. Windows 95/98/ME may not be able to successfully edit every bitmap resource ID in every Gauge, depending on the Gauge size and layout.
If you edit a Gauge and then select Cancel, FS Panel Studio will restore the original files. This may take a few seconds. If you'd like FS Panel Studio to keep backups of modified Gauges, make sure you select the backup option in the Preferences dialog.
Note that if you change the size of the bitmap while editing, it may not display correctly in Flight Simulator. Gauges normally are made up of multiple overlaid and masked bitmaps at varying offsets. If you modify the size of a bitmap, it may no longer line up correctly with other Gauge elements