There are four ways to open a Panel and its associated Windows for editing.
| • | The first method uses the normal Windows File:Open menu pick in FS Panel Studio; just as you would open a file in Notepad, for example. All panels used by FS98, FS2000/2 and CFS/2 are named panel.cfg, and exist in the following directory: |
C:\<FS Install Dir>\Aircraft\<Aircraft Name>\Panel
If you have multiple panels for an Aircraft, there will be multiple Panel directories, eg Panel, Panel.RG, Panel.IFR and so on.
| • | The second method is to double click on a panel.cfg file in the Windows Explorer. This will launch FS Panel Studio and open the file. You must first associate the .cfg extension with FS Panel Studio, using the Advanced Preferences dialog. |
| • | The third method is to drag a panel.cfg file in the Windows Explorer and drop it onto the FS Panel Studio Icon. |
| • | The fourth and last method, and probably the most useful, is to use the File:Open Aircraft Menu pick in FS Panel Studio (or the corresponding Toolbar button). This will bring up the following window: |
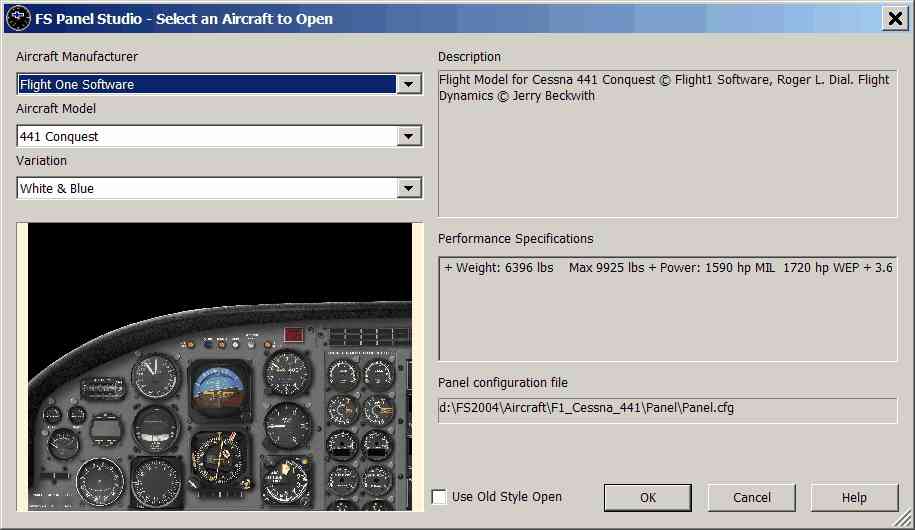
This dialog allows you to select the aircraft identically to the method used in FS2004. Select your desired Aircraft Manufacturer, Aircraft Model and Variation, the click on OK to open the aircraft.
If you are in a mode earlier than FS2000, or if you select the Use Old Style Open, you will see a menu like this:
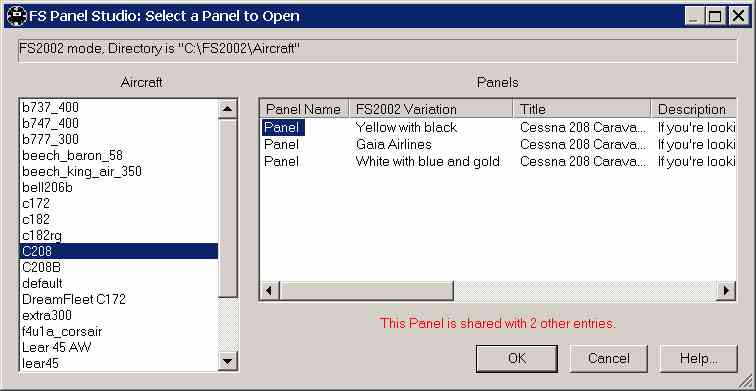
The top box will list the current FS Panel Studio Mode and the directory we are searching for Aircraft in (useful for verifying the directories are set correctly in the preferences dialog). The left Aircraft pane shows all installed Aircraft, and the right Panels pane will show the Panels installed for each aircraft. Along with the Panel Name, the Variation, Title and Description are listed to help you select the appropriate Panel (these entries are extracted from the Aircraft's aircraft.cfg configuration file).
NOTE: In the Example above, we see there are three identical Panels named Panel. There is, in fact, only one physical Panel on disk, which is shared by three entries in the aircraft.cfg file. They may vary in ATC ID or external texturing, but there is only one Panel. If you edit this Panel, all three Aircraft will display in Flight Simulator with the modified Panel. FS Panel Studio will warn you of this, as is shown in the example above, with the message "This Panel is shared with 2 other entries". Only Panels with unique names are unique Panels. If you select a shared Panel, FS Panel Studio will open the first in the list and edit it.
Note: If your aircraft is not installed properly then you won't see any Panels listed. This can happen if there is no aircraft.cfg file. You can still edit the Panel if it exists in the default location, which is the subfolder Panel with a filename of panel.cfg. In this case simply click on OK, and FS Panel Studio will look for this default Panel.
Highlight your selection and click the OK button to open.
FS Panel Studio will now ask you to select which window you wish to initially open for editing. The following will be displayed:

In the File Name box, you'll see the name of the actual disk file which will be opened. Along the right side is informational data about the sizes and name of the background bitmap. In the left, Windows pane, are the Windows defined in the panel.cfg file. Highlighting an entry will cause a view of the background bitmap (if one is defined) to be displayed in the bottom Preview area.
Select a Window and press the OK button to begin loading. As the window is loading (this may take several seconds) FS Panel Studio will update a progress bar at the bottom of the Main Window and display the names of the Gauges being loaded.